Home › Blog › Reef Tank Sump Guide
Reef Tank Sump Guide: Do You Need One, and How to Set It Up
May 9, 2026 · 9 min read · By NextUpReef
A sump is the single most useful upgrade in reefkeeping. It hides equipment, adds water volume, gives you somewhere to put a skimmer and refugium, and dramatically improves tank stability. If you're running a tank 40 gallons or larger and you don't have a sump, you're leaving stability on the table.
But sumps aren't mandatory — and they're not always the right answer. This guide walks through what a sump actually does, how to size and plumb one, and what equipment goes inside.
What a Sump Actually Does
A sump is just a second tank that lives below your display. Water overflows from the display down to the sump, gets filtered and processed, then a return pump sends it back up. That's it — mechanically simple.
What makes sumps valuable is everything you can do with that second tank:
- More water volume. A 30 gallon sump under a 75 gallon display gives you 105 gallons of water to dilute problems. Bigger volume means more forgiving chemistry.
- Hides equipment. Skimmers, heaters, ATO sensors, dosing pumps, and probes all live in the sump instead of the display.
- Better filtration. Filter socks, skimmer, media reactors, refugium — none of which fit comfortably in a display tank.
- Easier water changes. Drain and refill from the sump without disturbing the display.
- Stable water level. Evaporation happens in the sump, so your display surface stays consistent.
- Refugium space. A macroalgae refugium for nutrient export and pod production — only possible with a sump (or AIO chamber).
When You Actually Need a Sump
Sumps aren't free — they cost money, take up cabinet space, require plumbing, and add complexity. Here's when they earn their place:
- Under 30 gallons: Skip the sump. An all-in-one design is simpler and just as effective.
- 30 to 40 gallons: Either works. AIO is easier, sump opens upgrade paths.
- 40 to 75 gallons: Sump strongly recommended. Equipment stops fitting in AIO chambers.
- 75 gallons and up: Sump essentially required. The benefits compound at this scale.
For nano reef setups under 30 gallons, see our nano reef tank guide — all-in-one is almost always the right call there.
How to Size a Reef Tank Sump
The general rule: a sump should be 25 to 33 percent of your display tank volume. Bigger is always better. The two real constraints are:
- Cabinet space. Measure the inside of your stand before buying.
- Power outage capacity. When the power dies, water drains from the display into the sump until siphon breaks. The sump must hold that water without overflowing.
Common pairings reefers run:
- 40 gallon display: 10 to 20 gallon sump
- 75 gallon display: 20 to 30 gallon sump
- 120 gallon display: 30 to 40 gallon sump
- 180+ gallon display: 50+ gallon sump
The Three-Chamber Sump Layout
Most reef sumps follow the same three-chamber design. Water enters one end, gets processed through the middle, and is returned from the far end.
- Chamber 1: Inlet / Skimmer
Water from the display lands here. A filter sock catches debris (replace 1 to 2 times per week). Protein skimmer sits in this chamber where it gets the dirtiest water — that's where it's most effective. - Chamber 2: Refugium / Media
Middle chamber. Houses a refugium with chaeto, GFO or carbon reactors, biopellets, or just open water for added volume. Light it on a reverse photoperiod (on at night) to stabilize pH. - Chamber 3: Return
The return pump sits here, along with the heater, ATO sensor, dosing line outlets, and probes. This is also where evaporation happens, so the water level here drops as the tank evaporates.
Plumbing: Overflow and Return
The plumbing connecting your display to your sump is the most important piece — get this wrong and you flood your house.
Overflow: Water leaves the display via an overflow box (either built-in to the tank or a hang-on-back). Most modern reef setups use a Herbie or Bean Animal overflow — both are silent designs that use two or three drain lines for safety. A single drain line is fragile and risks flooding when it clogs.
Return: Water pumps back up through a return line, usually ½" or ¾" PVC or flexible tubing. Add a check valve or a siphon break (a small hole drilled in the return line below the water surface) so water stops siphoning back when the pump shuts off.
Sizing the return pump: Aim for 3 to 5 times sump-through-display turnover. A 75 gallon display wants 600 to 900 gph at the return — accounting for head loss from the height your pump needs to push. DC pumps (Sicce Syncra, Reef Octopus Vario S) are quieter and adjustable. AC pumps are cheaper but louder.
Don't oversize. A pump pushing too much through the sump strips the skimmer's contact time and risks overflowing the sump if the drain can't keep up.
What Equipment Goes Inside
Standard sump equipment list for a 75 gallon mixed reef:
- Filter sock or filter floss: Mechanical filtration on the inlet.
- Protein skimmer: Sized for 1.5x your display volume (skim ratings are inflated). Reef Octopus, Bubble Magus, and Aquamaxx are popular.
- Heater (or two): 200W for a 75 gallon. Two smaller heaters are safer than one large one — if one fails, you have backup.
- Auto top-off (ATO): Optical sensor in the return chamber, controller, and a reservoir of RODI water. Tunze Osmolator and AutoAqua Smart ATO are industry standard.
- Refugium light: Small full-spectrum LED on a reverse cycle.
- Probes: Temperature, pH, ORP if you run a controller.
- Dosing tubes: Output lines from your dosing pumps end above the return chamber.
- Optional reactors: GFO, carbon, biopellet, or kalkwasser reactors plumbed in-line or sitting in the middle chamber.
Common Sump Mistakes
- Sump too small for power outage capacity. When power dies, water siphons back to the lowest point. If your sump can't hold the drained water, you flood. Fill the sump partially and pull the plug to test before stocking.
- Single drain overflow. A snail, fish, or piece of filter sock can clog a single drain. Always have a backup drain or use a Herbie / Bean Animal design.
- No check valve on the return. Water siphons back to the sump on power loss. A siphon-break hole drilled into the return line near the surface is more reliable than a check valve (check valves fail closed when they get gunked up).
- Return pump oversized. Causes overflow noise, strips skimmer effectiveness, and stresses the overflow.
- Refugium too small. A 1-gallon refugium chamber filled with a tennis-ball of chaeto won't move the needle on nitrate. Make it as big as your sump allows.
- Heater outside the sump. Heaters in the display are eyesores and dangerous if a fish brushes them. Move them to the return chamber.
Why Tracking Matters with a Sump
A sump adds equipment — and equipment fails. Heaters stick on, return pumps lose impellers, ATO sensors get encrusted, skimmers overflow, refugium lights burn out. The more gear in your system, the more places for trouble to hide.
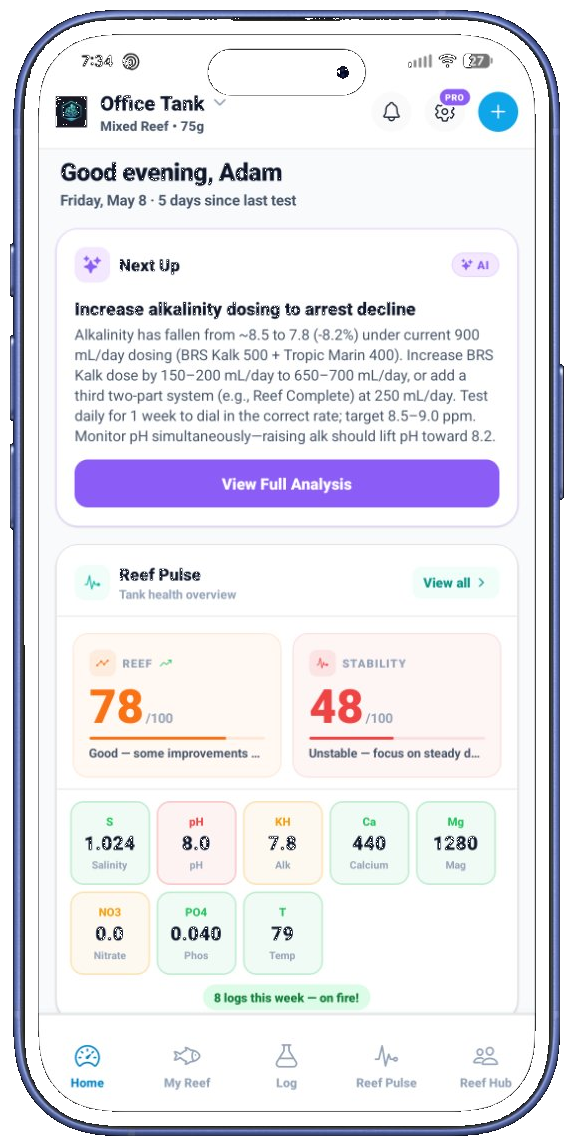
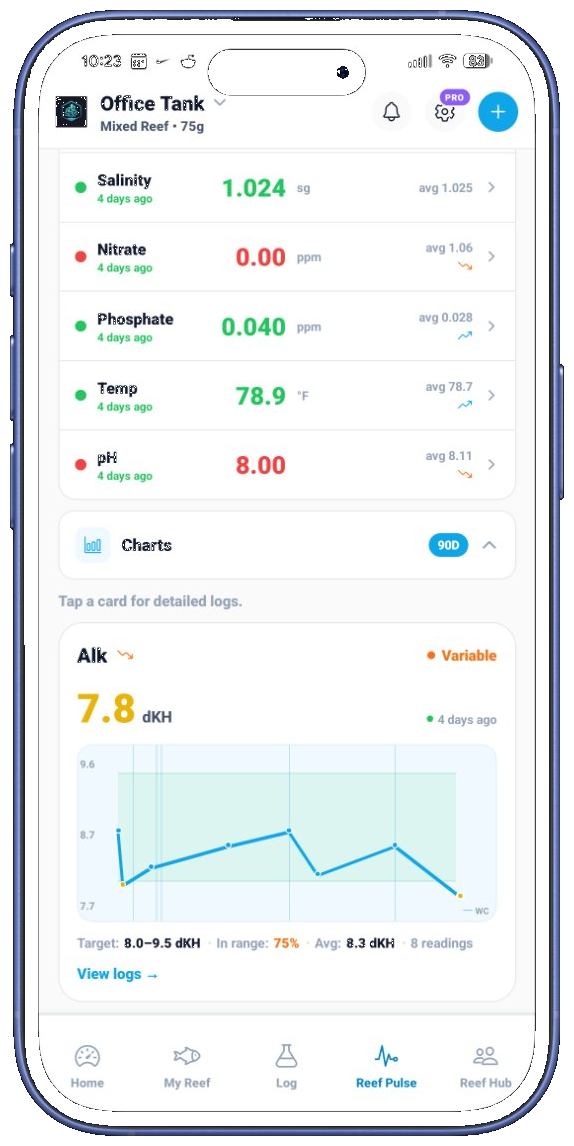
NextUpReef tracks parameters and reminders together. Set reminders for filter sock changes, ATO reservoir refills, refugium harvests, and skimmer cleanings. Log parameters consistently and the app warns you when readings drift — usually before the corals show it. See our parameter tracking guide →
Final Thought
If you're building a reef tank 40 gallons or larger and you have cabinet space, add a sump. Every reefer who switches from AIO to a sumped system says the same thing: they wish they'd done it sooner. The added water volume alone is worth it — chemistry stops being a daily fight and starts being a weekly maintenance task.
Track your reef tank with NextUpReef — free.
Parameters, reminders, equipment, and AI advice — built for reef keepers who actually care about stability. iOS and Android.